

What will you need: non fusible interfacing, piece of felt, pinking shears, eyelets and dried lavender.

I used local non fusible interfacing (100g). Make sure there is no glue on any side! The reason to use interfacing is, it doesn't fray and it holds shape properly. It doesn't have woven texture like fabric so it will hold dried content securely.
Cut out rectangle measuring 34x20cm. Fold and sew where the red line is. Leave 1/4 inch at the begging and end as the edges will be trimmed with pinking shears. Turn inside out and move over to ironing board.

I prefer to put the seam to the side but you can have it in the middle like real tea bag. Your choice. Press. The side with the seam should facing up. Fold in half and press.
We need to have the seam inside and create crease on each side to form the bottom part of teabag. Just fold about half inch on each side while having the center crease in the middle. Check below picture or any tea bag for reference. Finally I folded top edges about an inch and pressed to create crease which define final tea bag size.

Back to the sewing machine. Sew a line where we created the bottom creases to prevent anything falling into that section. I marked red line as the stitches are not clearly visible.

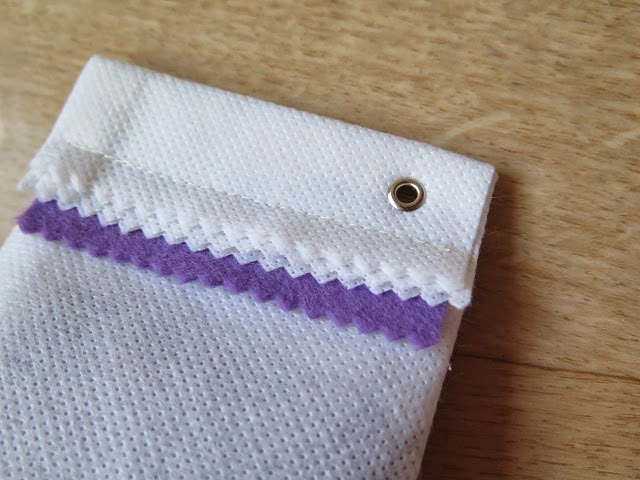
Time to use those fancy pinking shears. Cut the edges. Prepare piece of felt to add a bit of color. Fill with dried lavender. The top crease will help you to determine how much to fill.

Once filled, fold the top edges over, add stripe of felt and sew over. Finish with eyelet.
You just created simple and quick gift. Ask your kids to make tags to add personal touch and these are good to go.

Cute little project - thanks for the tutorial!
ReplyDeleteI wondered how you made the 'teabag' fold! I see!
ReplyDeleteI have several lavender sachets in my cupboards, but none like yours. Using interfacing is a great idea and they look so cute.
ReplyDeleteRosemary B here:
ReplyDeleteThese are super cute. I do have lavender and now I am going to make these
Thanks for the wonderful idea!
Thanks for the tutorial. You always make things look so easy.
ReplyDelete