Sunday, December 27, 2015

Bits and pieces


I made small progress on my scrappy cushion cover #2. I pieced 6 rows out of 10.


I also made some prep work for Darth Vader #2. I promised mug rug for a friend so I used what was left from #1. If you like such concept feel free to enter my giveaway.


I used few more bits for small pouch. All the pieces are cut out and ready to go.

I'm trying to figure out my plans for 2016. Instead of long list I'm going to take it by small steps. I really like the concept of #sewtake20 so that is going to be my approach of upcoming year.

Linking up with:

Quilting is more fun than Housework

Wednesday, December 23, 2015

Dark side giveaway


Since I missed the SMS giveaway week and many other linkies I decided to have a giveaway on my own. It is a little thank you for your patience, support and kindness.

When I saw this meme on Internet, I knew I have to make one. Color spectrum and Darth Vader? Who can resist?


Time for drawing compass. With a little wine support I was able to make my circles :)


Darth Vader was partially done by machine and partially by hand. The whole thing measures 8x9".


Here is the back.


And look at that winter weather! No wonder I'm not in Christmas spirit. How about you?


I wouldn't rank myself SW fan but I sure find these meme funny.

How to enter my giveaway:
1. Answer my question. What is your favorite villain (baddy)? No need to be SW related.
2. All followers get a second chance. Just let me know you follow my force :)
This giveaway ends on New Years Eve 00:00


Linking up with Finish it up Friday (on Monday):

Sew Fresh Quilts 

Sunday, December 13, 2015

Still happy


When I was joking about "time flies" in my last post, I was not expecting the month will fly by so quickly. I didn't even managed to write a post. I'm doing well BTW.


I admit there is not much to write about as my sewing machine got a bit dusted.


I did add a little personal touch to the pouch I was making but I couldn't make myself to finish it.


It looks like two different pouches, doesn't it? :)


It is made out of one piece. Just the way I like it. No seam at the bottom.


I added a little red accent to the zipper end and zipper pull which correspond with the lining.
I decided to join Elm Street Quilts Bag It. Check out the tuts and pretty bags shared.

Elm Street Quilts

Wednesday, November 11, 2015

Scraptastic happiness


I'm back to my usual rainbow self :) This is partially quilted pouch and I'm making plans for some hand quilting aka personal touch.


Plus my other scrappy triangle project moved closer to the machine.


What a happy sight. Don't forget to link up to Scraptastic Tuesday. I missed twice since the Time flies :)


Thursday, November 5, 2015

Throwback Thursday


Welcome to Throwback Thursday. This time it's shirt quilts edition for me. You can read the gnome edition here. When I talked about whole roll of gnomes that was just a 10 meters if anyone was wondering, lol.


When I started with quilting I didn't pay much attention to fabrics. I wanted something affordable in case I ruin it. So my choice were fabrics which are used for making shirts.


It also helped that my friend was selling those. So I bought some and made this quilt for my FIL.


Quilting is not my strong feature so you see I haven't done much of it.


I tried zig zag stitch on binding. It worked pretty well.


I also used these fabrics on my FMQ adventure. This one was started during Groovy quilt along.


My quilting style is called ANYHOW :)


It is fun to look back. Come and join Throwback Thursday.

Saturday, October 31, 2015

Oh Scrap!


Welcome to my post for Oh Scrap! linky party. I enjoy playing with scraps and Cynthia has many ideas in store. That's why I like to follow her blog and I'm honored to be featured there.


I started with some tiny strips. When it comes to scraps I say: If you cannot sew them - fuse them!
I use light weight fusible interfacing.


You can also read about my fusing adventures here and there.


This was  my first take on strips and I would definitely recommend to place them much closer together. Maybe even overlap a bit. Once I quilted it there were visible gaps which I had to fix later.


I quilted over the gaps with triple stitch to hide them completely. Much better!


I also wanted to try ticker tape kind of block. Both projects have raw edges.
Now a little how to pics. Creating tin cover is pretty easy.


Once I'm happy with quilting on the middle part I mark the size of my tin. See the black line on top and bottom? It is good to cut of batting which is shown in right bottom corner. I use Frixion pen so this line will disappear once I iron it.


Just fold down the overlapping fabric and top stitch the edges on both sides.


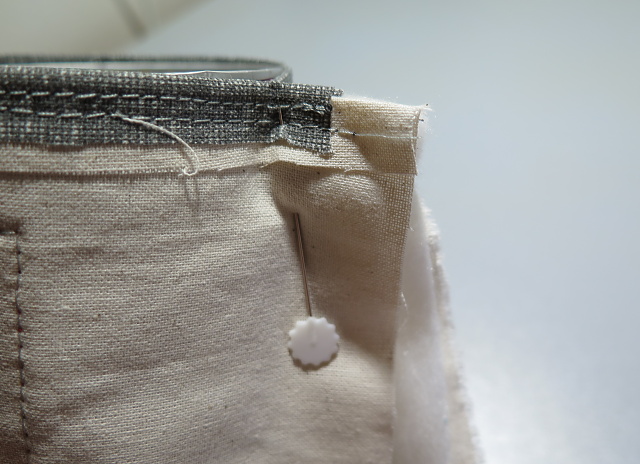
Wrap around your tin and make marks on both sides as well. Don't make it too tight.


I draw a line from the marks on both sides. I fold over, pin and sew right on the line. Cut of and turn around.


And that's all. Just slide it on your tin.


I like to put piece of foam inside when used for pens.


This color combo is definitely my fav. Have you noticed? :)


I made some tin covers before. They are great for using scraps, QAYG technique or your selvages.


I'm sure you can use some tins yourself. So have fun making them!
If you have some scrappy project yourself. Please share on Oh Scrap!
Linking up with:

  Quilting is more fun than Housework