

Welcome to my post for Oh Scrap! linky party. I enjoy playing with scraps and Cynthia has many ideas in store. That's why I like to follow her blog and I'm honored to be featured there.

I started with some tiny strips. When it comes to scraps I say: If you cannot sew them - fuse them!
I use light weight fusible interfacing.

You can also read about my fusing adventures here and there.

This was my first take on strips and I would definitely recommend to place them much closer together. Maybe even overlap a bit. Once I quilted it there were visible gaps which I had to fix later.

I quilted over the gaps with triple stitch to hide them completely. Much better!

I also wanted to try ticker tape kind of block. Both projects have raw edges.
Now a little how to pics. Creating tin cover is pretty easy.

Once I'm happy with quilting on the middle part I mark the size of my tin. See the black line on top and bottom? It is good to cut of batting which is shown in right bottom corner. I use Frixion pen so this line will disappear once I iron it.

Just fold down the overlapping fabric and top stitch the edges on both sides.
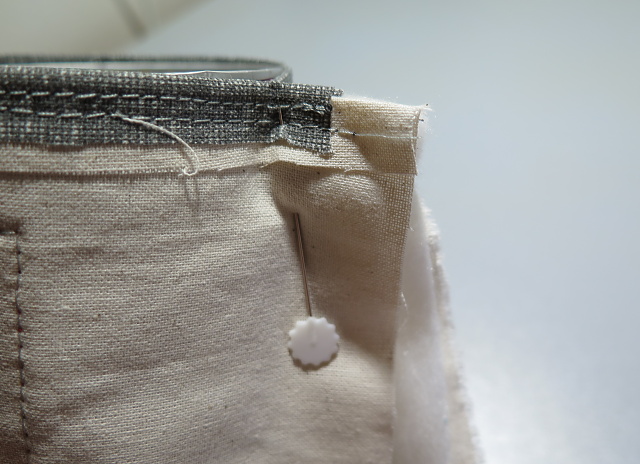
Wrap around your tin and make marks on both sides as well. Don't make it too tight.

I draw a line from the marks on both sides. I fold over, pin and sew right on the line. Cut of and turn around.

And that's all. Just slide it on your tin.

I like to put piece of foam inside when used for pens.

This color combo is definitely my fav. Have you noticed? :)

I made some tin covers before. They are great for using scraps, QAYG technique or your selvages.

I'm sure you can use some tins yourself. So have fun making them!
If you have some scrappy project yourself. Please share on Oh Scrap!
Linking up with:

So pretty and bright, and I love it. You inspire me to try one, but tins are not the easiest thing to find in my house. I have to buy some now.
ReplyDeleteRainbow is your favorite color combination? ;) The brights with a touch of green is very nice, and I noticed even your pens in the tins are in those colors.
ReplyDeleteOh those are just adorable, and I need some at my sewing table :D I certainly have enough scraps to make 2 or 3 (or 100) of these! ;)
ReplyDeleteOH! LOL I just noticed - Yvonne is right - your pens DO match your scraps! Very cool :D
ReplyDeleteThanks for the ideas; I can certainly use some containers in my sewing room. Now to save some tines!
ReplyDeleteVery cool way to use up strips! I've been saving mine and now I know what I might do with them. Thanks for the tip re fusing them, that makes total sense!
ReplyDeleteThank you Vera, These are super cute! Great tutorial! x Teje
ReplyDeleteWhat a fabulous way to use small scraps. Good idea to put foam in the bottom of the tins.
ReplyDeleteThey are super adorable!! Visiting from Oh Scrap.
ReplyDeleteVery fun! Thanks for sharing.
ReplyDeleteSuch a great idea! I love little projects like that, and never would have thought to use the fusible interfacing for the tiny scraps!
ReplyDeleteVisiting from Oh Scrap! These are beautiful. So many things one can do, so many possible variations!
ReplyDeleteGreat idea for scraps. Popped over from Oh Scrap!
ReplyDeleteI like your favorite color combination, too. These are great, Vera! I have been following you for a while on Bloglovin, but I came here this time from Oh Scrap!
ReplyDeleteI feel Christmas gifts coming on here! Excellent use of scraps, and recycling our materials. Brilliant idea!
ReplyDeleteLove it. Thanks for the tutorial. Now I have to start saving tins.
ReplyDeleteI wondered how you fixed the gaps and then I read about 'colouring in' with thread to hide the white. Ingenious!
ReplyDeleteI see what you mean about overlaps - they are needed because the fabric shrinks a smidge when quilted, right?
Love this! I'm bookmarking and will try this instead of putting the empty tins in the recycling bin! Thank you for sharing how you make them.
ReplyDeleteWhat a brilliant idea! I already use cans and the like to keep my pens and pencils in - now they will look so much smarter :) Thank you!
ReplyDelete